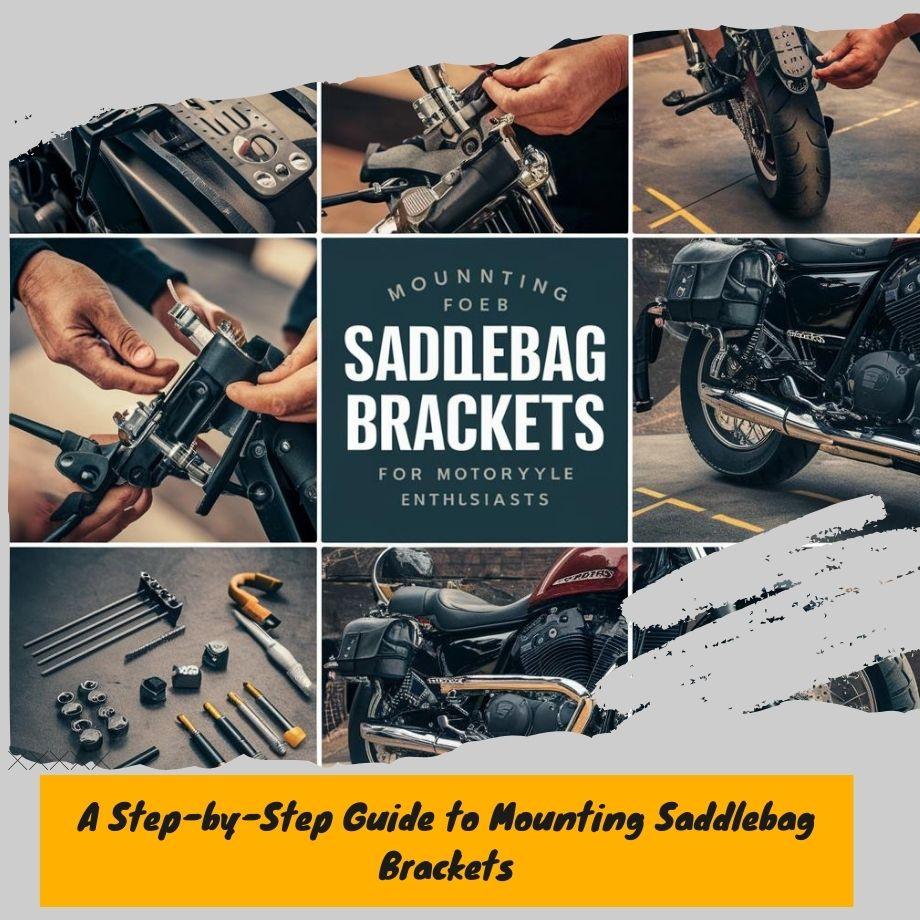
Hit the Open Road: A Step-by-Step Guide to Mounting Saddlebag Brackets
What are Saddlebag Brackets?
Saddlebag brackets are essential components for Harley-Davidson motorcycles that allow riders to securely mount saddlebags or luggage cases to their bikes.
These brackets serve as the sturdy foundation upon which the saddlebags are installed, ensuring a safe and reliable way to carry your belongings while cruising down the open road.
For Harley enthusiasts, saddlebags are more than just functional accessories – they are a symbol of the freedom and adventure that comes with the riding lifestyle.
With saddlebag brackets, you can hit the road with the peace of mind that your gear is securely stowed away, leaving you free to focus on the journey ahead.
These brackets are designed to seamlessly integrate with your Harley's frame, providing a sleek and stylish look that complements the motorcycle's aesthetic.
Whether you're embarking on a cross-country journey or simply running errands around town, saddlebag brackets allow you to bring along everything you need without compromising the bike's performance or handling.
Types of Saddlebag Brackets
Saddlebag brackets come in various styles and materials to suit different preferences and Harley models. The most common types include:
Chrome Brackets: These shiny, polished brackets add a classic and sleek look to your bike. Chrome brackets are typically made from high-quality stainless steel or chrome-plated steel for durability and corrosion resistance.
Black Brackets: For a more understated and stealthy appearance, black saddlebag brackets are a popular choice. These can be powder-coated or made from black anodized aluminum or steel.
Quick-Release Brackets: Designed for convenience, quick-release brackets allow you to easily remove and reattach your saddlebags without tools. This is handy for storage or when you need to access the area behind the bags.
Throw-Over Brackets: These brackets are designed to "throw over" or mount directly onto the fender struts of specific Harley models, providing a clean and minimalist look without the need for additional mounting hardware.
Model-Specific Brackets: Many saddlebag bracket manufacturers offer options specifically designed to fit certain Harley-Davidson models, ensuring a perfect fit and seamless integration with your bike's lines and styling.
You May Also Like: Popular Saddlebag Options for the Road King
When choosing saddlebag brackets, consider compatibility with your Harley model, personal style preferences, and any additional features you may desire, such as quick-release functionality or a specific finish to match your bike's aesthetic.
Tools and Supplies Needed
To mount your saddlebag brackets successfully, you'll need the following tools and supplies:
Tools:
- Metric socket set (most likely 10mm, 12mm, and 14mm sockets)
- Combination wrenches (same sizes as above)
- Ratchet and extension
- Allen wrenches/hex keys
- Torque wrench
- Wire brush or Scotch-Brite pad
Supplies:
- Saddlebag brackets (make sure they're compatible with your bike model)
- Mounting hardware (bolts, washers, spacers, etc.) - usually included with the brackets
- Thread locker (medium-strength, like Loctite 243)
- Anti-seize lubricant
- Dielectric grease (for electrical connections)
- Shop rags
- Degreaser or brake cleaner
Having the right tools and supplies on hand will make the installation process much smoother and ensure a secure, long-lasting fit for your saddlebag brackets.
Step-by-Step Installation Guide
Installing saddlebag brackets on your Harley-Davidson motorcycle is a straightforward process, but it's essential to follow the correct steps to ensure a secure and proper fit. Here's a detailed guide to help you mount your saddlebag brackets like a pro:
-
Prepare the Motorcycle
- Park your Harley on a level surface and engage the side stand.
- Remove any existing saddlebags or mounting hardware.
- Clean the area where the brackets will be installed to ensure proper adhesion.
-
Identify the Mounting Points
- Consult your Harley's service manual or online resources to locate the specific mounting points for your motorcycle model.
- These points are typically located on the rear fender or frame, near the rear axle.
-
Install the Mounting Brackets
- Carefully follow the instructions provided with your saddlebag bracket kit.
- Typically, you'll need to secure the brackets using bolts, washers, and nuts.
- Ensure the brackets are level and aligned correctly before tightening the hardware.
-
Attach the Saddlebags
- Once the brackets are securely mounted, it's time to attach your saddlebags.
- Align the saddlebag mounting points with the brackets and secure them using the provided hardware (e.g., quick-release latches, bolts, or straps).
- Make sure the saddlebags are level and evenly spaced on both sides.
-
Adjust and Secure
- With the saddlebags attached, double-check the alignment and ensure they're securely fastened.
- Tighten any loose hardware or straps as needed.
- Test the saddlebag stability by gently rocking them back and forth.
-
Final Checks
- Take a step back and inspect your work from various angles.
- Ensure the saddlebags are level, properly spaced, and securely mounted.
- Check for any potential interference with other components, such as the exhaust or suspension.
Remember, proper installation is crucial for the safety and longevity of your saddlebag setup. If you encounter any difficulties or have concerns, consult a professional mechanic or refer to your Harley-Davidson dealer for assistance.
Tips and Tricks
When mounting saddlebag brackets on your Harley, there are a few insider tips and tricks that can make the process smoother and help you avoid common pitfalls:
- Use a torque wrench to ensure the proper tightness of bolts and avoid stripping threads or over-tightening.
- Apply a small amount of anti-seize compound on bolt threads to prevent galling and make future removal easier.
- If you're having trouble lining up the bracket holes, use a mallet to gently tap the bracket into position.
- For a cleaner look, route any wiring or cables through the saddlebag brackets before final tightening.
- Check for clearance between the saddlebags and other components like exhaust pipes or rear fenders when loaded.
- Consider upgrading to quick-release saddlebag brackets for easy removal and installation of your bags.
- When remounting saddlebags, use a soft cloth or towel to protect your bike's paint from scratches.
- Keep an extra set of saddlebag keys or combination codes handy in case you misplace the originals.
These tips from experienced Harley riders can save you time, frustration, and potential damage during the saddlebag bracket installation process. With a little know-how, you'll have those bags mounted securely and looking sharp in no time.
Troubleshooting Common Issues
Mounting saddlebag brackets can sometimes present a few challenges, but don't worry – most issues are easily fixable. Here are some common problems you might encounter and how to troubleshoot them:
Misalignment: If your saddlebags seem off-center or crooked after installation, double-check that the brackets are properly aligned and tightened. Loosen the bolts, adjust the bracket position, and retighten everything securely.
Loose Brackets: Vibrations from riding can cause the brackets to loosen over time. Periodically inspect the mounting hardware and tighten any loose bolts or nuts. It's also a good idea to apply a thread-locking compound to prevent future loosening.
Interference Issues: In some cases, the saddlebag brackets may interfere with other components on your bike, such as the rear fender, turn signals, or exhaust pipes. You may need to slightly adjust the bracket positioning or use spacers to create clearance.
Scratches or Damage: Be careful when installing the brackets to avoid scratching or denting your bike's paint or chrome. Use protective coverings or have someone assist you to avoid accidental damage.
Rattling Noises: If you hear rattling or vibration noises coming from the saddlebags, ensure that all mounting hardware is tightened properly and that the bags themselves are securely fastened to the brackets.
Remember, proper installation and regular maintenance are key to ensuring your saddlebag brackets remain secure and trouble-free. Don't hesitate to seek professional assistance if you encounter persistent issues or feel uncomfortable with the installation process.
Saddlebag Mounting Alternatives
For those who prefer a more temporary or versatile solution, there are several alternatives to permanently mounted saddlebag brackets.
One popular option is a quick-detach saddlebag mounting system, which allows you to easily remove the bags when desired.
These systems typically consist of docking hardware that mounts to the motorcycle's frame or rear fender, with corresponding docking points on the saddlebags themselves. This way, you can quickly attach or detach the bags as needed.
Another alternative is to mount the saddlebags to a sissy bar or luggage rack. This approach is particularly useful for riders who already have a sissy bar installed or plan to add one.
Sissy bar-mounted saddlebag supports offer a sleek and integrated look, while also providing easy access to the bags from the rear of the motorcycle.
For those seeking a minimalist approach, there are also saddlebag mounting solutions that utilize the existing frame or rear fender mounts on the motorcycle.
These often involve clamps or brackets that secure the bags directly to the frame or fender, without the need for additional hardware.
Regardless of the mounting method you choose, it's important to ensure that the saddlebags are securely fastened and won't interfere with the motorcycle's operation or your riding position.
Additionally, consider the weight capacity and distribution of the mounting system, as overloading can compromise handling and safety.
Safety Considerations
Proper installation of saddlebag brackets is crucial for safe riding. Improperly mounted saddlebags can come loose while riding, posing a significant hazard to you and other motorists on the road.
Loose saddlebags can shift unexpectedly, affecting the balance and handling of your motorcycle.
Weight distribution is another essential factor to consider. Saddlebags add extra weight to your bike, and if not properly balanced, this can lead to handling issues, increased braking distances, and potential loss of control.
It's essential to follow the manufacturer's guidelines for maximum weight capacity and ensure even weight distribution across both saddlebags.
Additionally, loose or poorly mounted saddlebags can rub against other parts of the motorcycle, causing damage to the bike or the bags themselves. This can lead to costly repairs and potential safety risks if the damage goes unnoticed.
By following the proper installation procedures and regularly checking the tightness and security of your saddlebag brackets, you can ensure a safe and enjoyable riding experience while protecting your investment in your motorcycle and gear.
Caring for Your Saddlebag Brackets
Proper care and maintenance are crucial to ensure your saddlebag brackets remain in top condition for years to come. Here are some tips to help you keep your brackets looking great and functioning properly:
Cleaning
Regularly cleaning your saddlebag brackets is essential to prevent the buildup of dirt, grime, and road debris.
Use a mild soap and water solution, along with a soft-bristle brush or cloth, to gently scrub away any accumulated grime. Avoid using harsh chemicals or abrasive materials, as these can damage the finish or scratch the surface of the brackets.
Rust Prevention
Rust can be a major issue for saddlebag brackets, especially if they're made of steel or other ferrous metals. To prevent rust, it's crucial to keep the brackets clean and dry.
After washing, thoroughly dry the brackets with a clean cloth or compressed air. You can also apply a thin layer of rust-preventative spray or wax to create a protective barrier against moisture and oxidation.
Scratch Protection
Saddlebag brackets are prone to scratches, especially if you frequently remove and reinstall them. To protect against scratches, consider applying a clear protective film or coating to the surface of the brackets. This will create a barrier between the metal and any abrasive surfaces or objects that could potentially scratch the finish.
Vibration Damping
Excessive vibration can cause saddlebag brackets to loosen over time, potentially leading to damage or even the loss of your saddlebags. To minimize vibration, ensure that the brackets are securely tightened and that any rubber or plastic bushings are in good condition.
You can also apply a small amount of vibration-dampening compound to the mounting points to help absorb and dissipate vibrations.
Storage
When not in use, store your saddlebag brackets in a dry, cool place, away from direct sunlight and moisture. If possible, wrap or cover them with a protective cloth or bag to prevent dust buildup and potential scratches.

Leave a comment