Make Quick Work of Your Harley Tour Pack Wiring With This Easy Disconnect System
What is a Tour Pack Quick Disconnect?
A tour pack quick disconnect is a handy electrical wiring system designed specifically for Harley-Davidson motorcycles equipped with a tour pack or rear luggage carrier. Its primary purpose is to provide a convenient way to quickly and easily disconnect the tour pack from the motorcycle's electrical system without the need for tools or complicated wiring procedures.
The tour pack quick disconnect system typically consists of a male and female connector that allows you to separate the tour pack's wiring harness from the main wiring harness of the motorcycle. This feature is particularly useful when you need to remove the tour pack for maintenance, cleaning, or storage purposes. Instead of having to disconnect individual wires or unplug multiple connectors, the quick disconnect system simplifies the process, saving you time and effort.
On Harley-Davidson motorcycles, the tour pack quick disconnect is often integrated into the wiring harness that runs from the motorcycle's battery and electrical system to the tour pack. This wiring harness powers the tour pack's lights, turn signals, and any additional accessories or electronics installed within the tour pack.
Benefits of a Quick Disconnect System
The quick disconnect system for your Harley-Davidson's tour pack offers several advantages that enhance convenience and versatility. One of the primary benefits is the ability to quickly and easily remove the tour pack from your motorcycle. This feature comes in handy when you need to access the storage area underneath or simply want to lighten the load for a more agile ride.
With a quick disconnect system, you can detach the tour pack in a matter of seconds, without the need for tools or complicated procedures. This not only saves time but also eliminates the hassle of dealing with cumbersome mounting hardware or intricate wiring connections.
Another significant advantage is the versatility it provides. By seamlessly disconnecting the tour pack, you can transform the appearance and functionality of your Harley-Davidson. This feature is particularly useful when you want to switch between a touring setup and a more streamlined, minimalist look for shorter rides or urban commutes.
Furthermore, the quick disconnect system ensures that you don't have to compromise on storage capacity. When you need the extra space for longer trips or camping adventures, simply reconnect the tour pack, and you're ready to go with ample storage for all your gear and essentials.
Overall, the quick disconnect system for your Harley-Davidson's tour pack offers unparalleled convenience, flexibility, and adaptability, allowing you to tailor your riding experience to suit your specific needs and preferences.
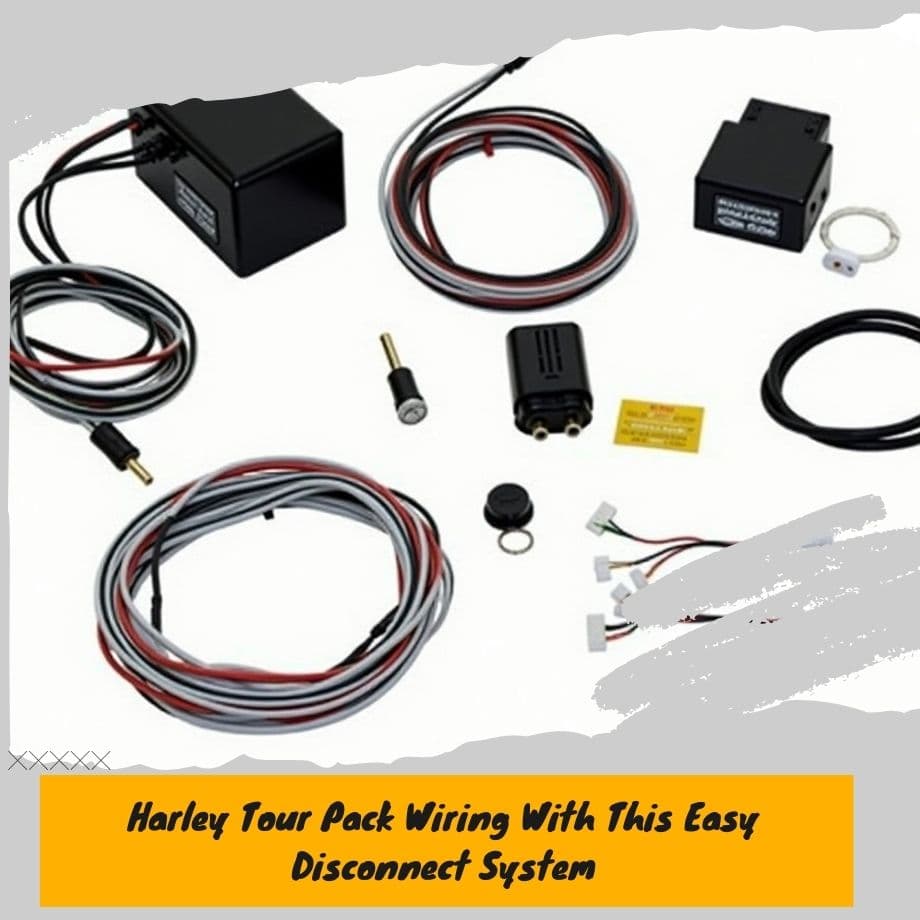
Wiring Components and Connections
The Harley-Davidson Tour Pack Quick Disconnect system consists of several essential wiring components and connections that facilitate the seamless integration of the Tour Pack with your motorcycle's electrical system. Understanding these components is crucial for a successful installation and proper functionality.
Connectors: The quick disconnect system relies on specialized connectors that allow for easy connection and disconnection of the Tour Pack wiring harness. These connectors are typically weather-resistant and designed to withstand vibrations and environmental conditions. They ensure a secure electrical connection while enabling convenient removal of the Tour Pack when needed.
Relays: Relays play a vital role in the quick disconnect system by acting as electrical switches. They control the flow of power to various components, such as the Tour Pack's lighting and accessories. Relays help prevent excessive current draw and protect the motorcycle's electrical system from potential overloads.
Wiring Harnesses: The Tour Pack quick disconnect system includes dedicated wiring harnesses. These harnesses consist of carefully routed and insulated wires that carry power and signals between the Tour Pack, connectors, relays, and the motorcycle's electrical system. High-quality wiring harnesses ensure reliable performance and minimize the risk of electrical issues.
Ground Connections: Proper grounding is essential for the safe and efficient operation of the quick disconnect system. Ground connections provide a path for excess electrical current to flow back to the motorcycle's battery, preventing potential damage to electronic components. Ensuring secure and clean ground connections is crucial during installation.
Fuse Blocks: Fuse blocks are incorporated into the wiring harnesses to protect the electrical components from short circuits or overcurrent situations. They contain fuses that act as sacrificial links, preventing damage to the more expensive components in case of an electrical fault.
Accessory Connectors: Depending on the specific Tour Pack model and configuration, there may be additional accessory connectors for integrating auxiliary lighting, speakers, or other electronic accessories. These connectors allow for seamless integration and power distribution to the desired accessories.
By understanding the various wiring components and connections involved in the Harley-Davidson Tour Pack Quick Disconnect system, you can ensure a proper installation, reliable performance, and the ability to easily remove and reconnect the Tour Pack as needed.
Step-by-Step Installation Guide
-
Disconnect the Battery: Before beginning any electrical work on your Harley, it's crucial to disconnect the negative (-) cable from the battery. This will prevent any short circuits or electrical shocks during the installation process.
-
Remove the Tour Pack: Carefully remove the tour pack from your motorcycle. Consult your owner's manual or seek professional assistance if you're unsure about the proper removal procedure for your specific model.
-
Locate the Wiring Harness: Locate the wiring harness that connects the tour pack to the motorcycle's electrical system. It's typically routed along the frame or under the seat.
-
Disconnect the Wiring Harness: Carefully disconnect the wiring harness from the tour pack and the motorcycle. Make note of the wire colors and their respective connections for easier reassembly later.
-
Install the Quick Disconnect Kit: Follow the instructions provided with your quick disconnect kit to install the male and female connectors. Typically, you'll need to crimp or solder the connectors onto the existing wiring harness.
-
Route the Wiring: Route the wiring harness with the newly installed quick disconnect connectors along the frame or under the seat, ensuring it's secure and away from any moving parts or sources of heat.
-
Connect the Quick Disconnect: Connect the male and female quick disconnect connectors, ensuring they're properly aligned and securely locked in place.
-
Test the Connections: Before reinstalling the tour pack, it's crucial to test the connections. Turn on the motorcycle's electrical system and check if the tour pack lights and any other connected accessories are functioning correctly.
-
Reinstall the Tour Pack: Once you've confirmed that the connections are working properly, carefully reinstall the tour pack onto your motorcycle, following the manufacturer's instructions.
-
Secure the Wiring: Use cable ties or other appropriate methods to secure the wiring harness and prevent it from dangling or rubbing against any moving parts or hot surfaces.
-
Reconnect the Battery: Finally, reconnect the negative (-) cable to the battery, ensuring a secure connection.
-
Test the System: With the tour pack reinstalled and the battery reconnected, test all the functions of the tour pack and any connected accessories to ensure everything is working correctly.
Remember, if you're unsure about any step or encounter difficulties during the installation process, it's always best to consult a professional mechanic or seek assistance from experienced Harley-Davidson enthusiasts.
Troubleshooting Common Issues
Even with a straightforward installation process, there may be times when you encounter issues with your Harley-Davidson tour pack quick disconnect wiring system. Here are some common problems and troubleshooting tips to help you get back on the road:
Loose Connections: Over time, vibrations and road conditions can cause connections to loosen, leading to intermittent power issues or complete failure. Inspect all connections regularly, ensuring they are tight and secure. If necessary, disconnect and reconnect the wiring harness to establish a solid connection.
Corroded Terminals: Exposure to moisture, road salt, and other elements can cause corrosion on the terminals, affecting the electrical flow. Clean the terminals with a wire brush or sandpaper, and consider applying a dielectric grease to prevent future corrosion.
Damaged Wiring: Inspect the wiring harness for any signs of damage, such as cuts, frays, or exposed wires. If you find any damage, replace the affected section or the entire harness to avoid potential electrical issues or safety hazards.
Blown Fuses: A blown fuse can prevent power from reaching the tour pack and its accessories. Check the fuse box and replace any blown fuses with the correct amperage rating. If the fuse continues to blow, investigate the cause, as there may be a short circuit or other underlying issue.
Faulty Accessories: If you've added aftermarket accessories to your tour pack, such as auxiliary lighting or a backup camera, these components could be causing interference or drawing too much power. Disconnect any non-essential accessories and test the system. If the issue persists, you may need to replace the faulty accessory or seek professional assistance.
Grounding Issues: Ensure that all ground connections are secure and free of corrosion or damage. A poor ground can cause intermittent or complete power loss, as well as potential electrical interference.
Remember, if you encounter any issues that you're unable to resolve or feel uncomfortable troubleshooting, it's always best to seek assistance from a qualified Harley-Davidson technician or an experienced professional. Proper maintenance and troubleshooting can help ensure the longevity and reliable performance of your tour pack quick disconnect wiring system.
Safety Considerations
When working with electrical wiring and the quick disconnect system on your Harley-Davidson motorcycle, safety should be your top priority. Here are some crucial safety considerations to keep in mind:
-
Always disconnect the negative battery cable before beginning any wiring work. This will prevent accidental short circuits and potential electrical shocks.
-
Wear insulated gloves and safety glasses to protect yourself from electrical hazards and potential sparks or debris.
-
Ensure that all wiring connections are secure and properly insulated to prevent shorts or exposed wires that could lead to electrical fires or damage.
-
Double-check all connections and wiring routes before reconnecting the battery to ensure there are no pinched or damaged wires that could cause issues down the road.
-
If you are unsure about any aspect of the wiring or installation process, consult a professional Harley-Davidson technician or refer to the manufacturer's instructions to avoid potential safety risks or damage to your motorcycle.
-
Keep the work area clean and organized to prevent tripping hazards or misplaced tools that could cause injury or damage.
-
Never work on electrical systems in wet or damp conditions, as moisture can increase the risk of electrical shocks or short circuits.
By following these safety considerations, you can help ensure a safe and successful installation of your Harley-Davidson tour pack quick disconnect wiring system.
Compatible Models and Years
The Harley-Davidson quick disconnect wiring system for tour packs is designed to work with a variety of Touring models from different years. This system is primarily intended for bikes equipped with a King Tour Pak or similar aftermarket luggage systems. Here are some of the compatible Harley-Davidson models and years:
Electra Glide Models
- Road King (1994-present)
- Street Glide (2006-present)
- Road Glide (1998-present)
- Ultra Classic (1989-present)
CVO Models
- CVO Road Glide (1999-present)
- CVO Street Glide (2008-present)
- CVO Limited (2014-present)
Trike Models
- Tri Glide Ultra Classic (2009-present)
- Freewheeler (2015-present)
It's important to note that while the quick disconnect wiring system is designed to be universal, some older models or custom configurations may require additional adapters or modifications for proper installation. Always consult with a professional or refer to the manufacturer's instructions to ensure compatibility with your specific Harley-Davidson model and year.
Accessories and Upgrades
One of the great advantages of installing a quick disconnect wiring system for your Harley-Davidson's Tour Pack is the ability to easily add accessories and upgrades. With the quick disconnect, you can seamlessly integrate various enhancements without the hassle of complex wiring modifications.
One popular upgrade is the addition of LED lighting to your Tour Pack. LED lights not only provide superior illumination but also consume less power, ensuring longer battery life. Many riders opt for LED brake lights, turn signals, or even interior lighting to enhance visibility and style.
Another common accessory is the installation of additional power outlets or USB ports. With the quick disconnect wiring system, you can easily route power to these outlets, allowing you to charge your devices or power accessories while on the road. This can be particularly useful for riders who rely on GPS units, heated gear, or other electronic devices during their journeys.
For those seeking even more convenience, some riders choose to integrate a backup camera system with their Tour Pack. The quick disconnect wiring makes it easy to route the necessary cables and power, providing an extra layer of safety and visibility when reversing or maneuvering in tight spaces.
Regardless of your specific accessory or upgrade preferences, the quick disconnect wiring system offers a versatile platform for customization. Whether you're seeking enhanced functionality, improved safety, or simply a personalized touch, the ability to seamlessly integrate these additions can elevate your riding experience to new heights.
Expert Tips and Advice
When it comes to wiring a Harley-Davidson tour pack quick disconnect system, there are a few expert tips and insights that can make the process smoother and ensure optimal performance:
-
Use High-Quality Connectors: Invest in high-quality connectors specifically designed for motorcycle applications. These connectors are built to withstand vibrations, moisture, and temperature extremes, ensuring a reliable connection and preventing corrosion or premature failure.
-
Proper Cable Routing: Pay close attention to cable routing to avoid pinching, chafing, or excessive bending of the wires. Secure the cables using appropriate cable ties or loom, ensuring they are protected from moving parts and potential damage.
-
Waterproofing Connections: Even with weather-resistant connectors, it's a good idea to apply a generous amount of dielectric grease or silicone sealant to the connections. This added protection will prevent moisture intrusion and corrosion, ensuring long-lasting performance.
-
Test Before Final Installation: Before securing the wiring and reassembling the tour pack, it's wise to perform a thorough test of the electrical system. Connect the battery and verify that all lights, accessories, and functions operate as intended. This step can save you from having to disassemble everything again if there are any issues.
-
Proper Grounding: Ensure that all ground connections are clean, secure, and properly attached to the frame or engine block. Poor grounding can cause electrical gremlins, such as flickering lights, intermittent issues, or even component failure.
-
Fuse Protection: Incorporate appropriate fuse protection for the quick disconnect circuit to safeguard against potential electrical shorts or overloads. This simple precaution can prevent costly damage to your electrical system or, worse, a fire hazard.
-
Maintenance and Inspection: Periodically inspect the wiring, connectors, and tour pack mounting points for any signs of wear, damage, or loose connections. Proper maintenance can extend the life of your quick disconnect system and prevent potential issues down the road.
Remember, working with electrical systems on a motorcycle requires caution, attention to detail, and a thorough understanding of the specific model and components involved. If you're ever unsure or uncomfortable with the process, it's always best to consult a professional Harley-Davidson technician or seek guidance from experienced enthusiasts in your local community.
Wrapping Up
Investing in a quick disconnect wiring system for your Harley-Davidson tour pack is a game-changer for riders who value convenience and versatility. This simple yet ingenious upgrade allows you to effortlessly remove and reattach your tour pack in a matter of seconds, without the hassle of dealing with tangled wires or complex electrical connections.
Beyond the practical benefits, the quick disconnect system also enhances the overall riding experience. No longer will you have to worry about leaving your tour pack behind when making stops or navigating tight spaces. With a simple pull of the connector, you can detach your pack and take it with you, ensuring your belongings remain secure and within reach.
Moreover, the quick disconnect system adds an extra layer of customization to your Harley-Davidson. Whether you prefer a sleek, minimalist look for certain rides or want to swap out tour packs for different occasions, this upgrade allows you to seamlessly adapt your bike's configuration to suit your needs.
In conclusion, the quick disconnect wiring system for Harley-Davidson tour packs is a must-have accessory for riders seeking convenience, versatility, and a touch of personalization. Its straightforward installation and user-friendly operation make it an investment that will pay dividends in terms of enhanced riding enjoyment and peace of mind on every journey.

Leave a comment